Grout is one of the hardest-working materials in your home, yet most homeowners treat it as an afterthought. Understanding what is the grout sealing process is the difference between tile that looks sharp for decades and grout that turns gray, moldy, and crumbles within a few years. Grout is porous and actively absorbs water, oils, and dirt every time your floor gets wet or your kitchen counter gets splashed. Skipping or rushing the sealing process doesn’t just affect appearance. It leads to moisture damage and costly repairs that most homeowners in Elgin, Bartlett, and Arlington Heights never anticipated when they installed their tile.
Table of Contents
- What is grout sealing and why is it important?
- When and how to apply grout sealer properly
- Choosing the right grout sealer: penetrating vs. topical options
- Testing, maintenance, and resealing recommendations
- Why rushing or skipping grout sealing costs homeowners more in the long run
- Protect your tile investment with professional grout sealing services
- Frequently asked questions
Key Takeaways
| Point | Details |
|---|---|
| Grout sealing protects tiles | Sealing grout lines prevents moisture and staining, extending tile lifespan and ease of cleaning. |
| Proper timing is crucial | Wait at least 24 to 72 hours after grout installation before applying sealer for best results. |
| Choose sealer type wisely | Penetrating sealers last longer and keep grout breathable; topical sealers offer surface protection but require more upkeep. |
| Test seal effectiveness | Use a water droplet test to confirm a successful seal and know when resealing is needed. |
| Professional sealing saves time | Experts deliver reliable, durable results and prevent common DIY mistakes. |
What is grout sealing and why is it important?
The grout sealing process is something every tiled surface in your home needs, yet it rarely gets the attention it deserves. At its core, a grout sealing process is the application of a protective sealer over grout lines to prevent moisture and contaminants from penetrating the porous surface below. Think of it like waterproofing a leather boot. The boot still looks like a boot, but it now repels the elements instead of soaking them up.
Without sealing, your grout lines absorb everything they contact. Soap residue in the shower. Cooking oils near the stove. Muddy water tracked across the entryway floor. Over time, these substances don’t just stain. They break down the grout structure itself, leading to cracking, crumbling, and eventually costly retiling.
The core benefits of grout sealing every homeowner should know:
- Stain resistance: Sealed grout resists coffee, grease, wine, and cleaning product discoloration.
- Moisture barrier: Sealing blocks water from penetrating grout lines, which prevents mold and mildew growth behind walls and under floors.
- Easier cleaning: Sealed grout releases dirt on the surface rather than absorbing it, so your regular mop or spray actually works.
- Extended tile life: When grout stays structurally sound, the tiles bonded to it stay level and secure.
- Cost savings: Sealing is a fraction of the cost of regrouting or retiling an entire bathroom or kitchen floor.
If you are already dealing with stained or deteriorated grout, pairing a professional cleaning with sealing delivers the best outcome. Our tile and grout cleaning services restore grout lines before sealing so the protection actually works.
When and how to apply grout sealer properly
Knowing why to seal is only half the job. The how matters just as much, and most DIY mistakes happen at the preparation and timing stages.
Timing is everything. Apply sealer only after grout has cured a minimum of 24 to 72 hours, following manufacturer instructions. Sealing too early traps moisture inside the grout before it has fully hardened, which weakens the structure from day one.
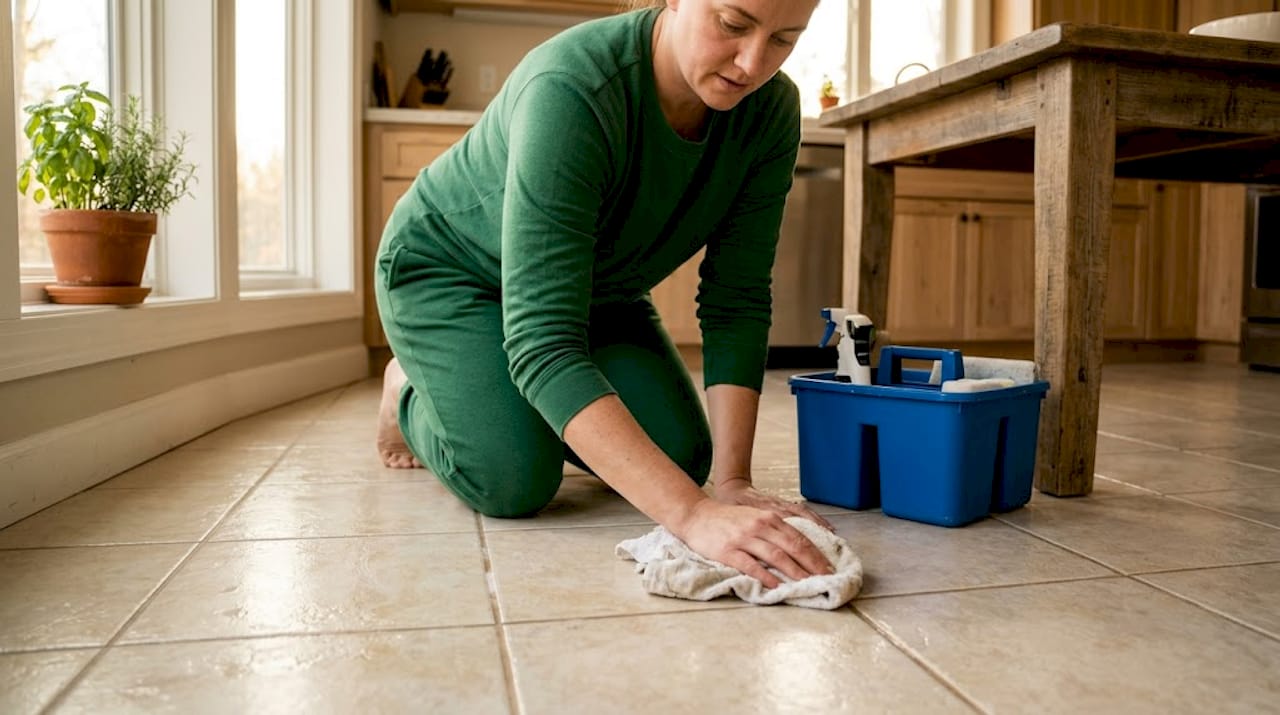
Here are the grout sealing process steps in the correct order:
- Clean the grout lines thoroughly. Remove all dirt, soap scum, oils, and residues using a grout-specific cleaner. This step is non-negotiable. Explore proven tile grout cleaning methods to do this correctly before you open the sealer bottle.
- Allow surfaces to dry completely. Wet grout will not absorb sealer evenly. Give it several hours after cleaning before you proceed.
- Apply sealer evenly using a brush, roller, or applicator bottle. Work in small sections. Focus the sealer directly on grout lines, not the tile face.
- Let the sealer penetrate for 10 to 15 minutes. This allows the product to soak into the grout pores where the protection actually forms.
- Wipe away all excess sealer from tile surfaces. Leftover sealer on tile dries into a hazy film that is difficult to remove once cured.
- Apply a second coat if the first was absorbed quickly. High-porosity grout may need two applications to reach full protection.
- Allow full cure before normal use. Typical application steps conclude with a 24 to 48 hour curing window before foot traffic, water exposure, or cleaning resumes.
Pro Tip: After applying sealer and wiping excess, run a damp cloth over tile surfaces within 5 minutes. This catches any residue before it hazes over, saving you from a frustrating cleanup later.
Choosing the right grout sealer: penetrating vs. topical options
With the process clear, the next step is choosing the sealer type that best fits your home’s needs. Not all sealers work the same way, and the wrong choice for a high-moisture area like a shower can mean resealing every year instead of every few years.
Penetrating sealers soak into grout pores providing protection while keeping grout breathable. Topical sealers form a surface film, may alter sheen, and often require more frequent upkeep. Here is a direct comparison:
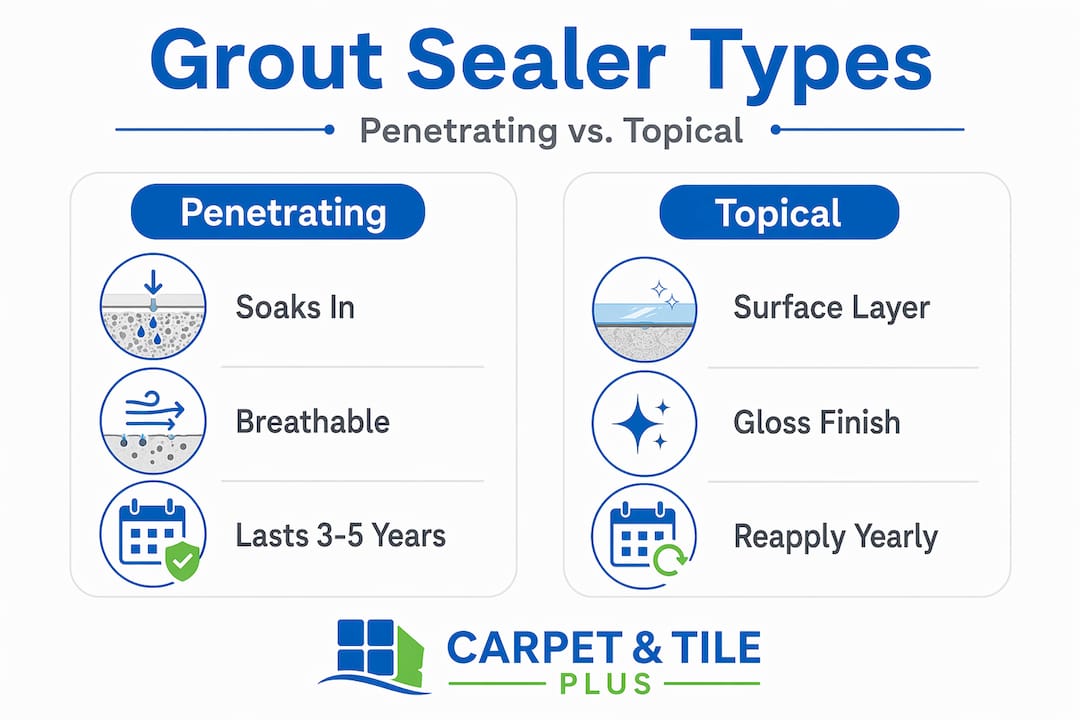
| Feature | Penetrating sealer | Topical sealer |
|---|---|---|
| How it works | Absorbs into grout pores | Forms a film on grout surface |
| Breathability | Yes, allows moisture vapor out | No, can trap moisture |
| Appearance change | Minimal to none | May add gloss or sheen |
| Durability | 3 to 5 years before resealing | 1 to 2 years before resealing |
| Best locations | Bathrooms, showers, high-moisture areas | Kitchens, low-traffic areas |
| Ease of application | Moderate | Easy |
Key considerations when choosing your sealer:
- Shower and bathroom walls: Always use a penetrating sealer. Topical sealers in steam-prone areas can peel or bubble.
- Kitchen backsplash and countertops: Topical sealers work fine here since moisture exposure is lower and they are easy to apply.
- Floor grout in high-traffic zones: Penetrating sealers hold up better under daily foot traffic and cleaning chemicals.
- Colored or decorative grout: Understanding how grout color sealing works is worth the extra research. Some sealers are tinted to restore or change grout color, not just protect it.
Pro Tip: If you are unsure which sealer to use, apply a drop of water to the grout line and watch. If it absorbs in under 30 seconds, you are dealing with highly porous grout that needs a penetrating sealer, regardless of location.
Testing, maintenance, and resealing recommendations
After sealing, knowing how to check and maintain your grout seal is key to preserving your investment. The good news is that monitoring sealed grout takes about two minutes and requires nothing more than a glass of water.
The water-bead test is the simplest and most reliable method. The water-beading test is the simplest way to know if grout needs resealing. Pour a few drops of water directly onto a grout line and watch what happens. Water that beads up and sits on the surface means your seal is working. Water that darkens the grout and absorbs within 30 seconds means it is time to reseal.
Maintenance habits that extend the life of your grout seal:
- Use pH-neutral cleaners only. Acidic or bleach-based cleaners degrade sealers over time. Vinegar, while popular as a natural cleaner, is particularly damaging to grout sealer.
- Clean spills quickly. Even sealed grout benefits from prompt cleanup, especially with oil-based substances.
- Avoid abrasive scrubbing pads. These scratch the sealer surface and create micro-channels where contaminants can enter.
- Inspect grout annually. Look for discoloration, cracking, or areas where water is absorbing instead of beading.
- Schedule professional cleanings. Buildup that household cleaners miss can degrade sealer from the surface. Our team uses equipment designed to clean without stripping the seal. See how professional grout cleaning tools make a measurable difference.
Penetrating sealers typically last 3 to 5 years before resealing, while topical sealers require renewal every 1 to 2 years depending on traffic and product type. Homes in the Northwest Suburbs of Chicago with hard water tend to see faster sealer degradation, since mineral deposits can slowly erode the protective barrier. Factor that into your resealing schedule.
“The single best maintenance habit is one annual water test per room. Five minutes once a year can prevent five thousand dollars in repairs.”
Why rushing or skipping grout sealing costs homeowners more in the long run
After two decades of working in tile and grout care across Elgin, Streamwood, Palatine, and beyond, we have seen the same costly pattern repeat itself. A homeowner installs beautiful new tile, rushes through the sealing step or skips it entirely, and then calls us two years later wondering why the grout is stained black and crumbling near the shower base. The answer is almost always the same two mistakes: sealing too soon or not at all, and skipping the pre-cleaning step.
Sealing too soon or skipping sealing traps moisture, weakens grout, and leads to costly repairs. When you seal before grout has fully cured, you lock moisture inside a material that needs to dry and harden. The result is soft grout that breaks down under normal foot traffic faster than it ever should. We have seen brand-new bathroom floors require partial regrouting within 18 months because the homeowner sealed on day one instead of waiting the full cure period.
The pre-cleaning mistake is equally destructive. Pre-cleaning is crucial because sealing over dirt traps grime, makes grout look dirty, and causes sealer failure. When you apply sealer over grout that has not been thoroughly cleaned, you are not protecting the grout. You are sealing the dirt into it. The grout line looks darker and dirtier than before, the sealer bonds poorly, and you end up resealing far sooner than expected.
The honest truth about what is grout maintenance is this: it is not glamorous, but it is cheap compared to the alternative. A professional sealing service typically costs a fraction of what a single regrouting job runs. Professional grout cleaning services ensure the surface is genuinely clean before any sealer is applied, which is something that is genuinely difficult to achieve with consumer-grade products alone.
If you are going the DIY route, patience is your most valuable tool. Wait for the full cure time. Clean until the grout looks its best. Apply sealer carefully and wipe every bit of excess. Rush any one of those steps, and the protection you are counting on simply will not hold.
Protect your tile investment with professional grout sealing services
For homeowners in the Northwest Suburbs of Chicago, getting grout sealing right is not just about aesthetics. It is about protecting a real financial investment in your home’s surfaces. Professional application ensures the sealer goes on correctly the first time, cures without issues, and lasts as long as the product is rated to.

At Carpet & Tile Plus, our IICRC-certified team handles every step of the grout sealing process, from deep cleaning to sealer application, using organic products that are safe for your family and pets. Whether you need residential tile and grout cleaning in a bathroom that has seen better days or commercial tile and grout cleaning for a business space in the area, we bring the tools and experience to deliver results that last. We also offer residential carpet cleaning for a complete home refresh. Contact us today to schedule your service and keep your tile looking its best for years to come.
Frequently asked questions
How long should I wait before sealing new grout?
You should wait at least 24 to 72 hours for grout to fully cure before applying sealer, following the specific manufacturer’s instructions for your product and grout type.
How can I tell if my grout needs resealing?
Perform a water droplet test on your grout lines: if water beads up, the seal is holding; if water absorbs and darkens the grout quickly, it is time to reseal.
What is the difference between penetrating and topical grout sealers?
Penetrating sealers soak into grout pores and allow breathability, lasting 3 to 5 years, while topical sealers form a surface film that changes grout sheen and needs renewing every 1 to 2 years.
Can I seal grout myself or should I hire a professional?
DIY sealing is possible, but professional sealing ensures thorough cleaning, even coverage, and correct curing, which prevents residue buildup and premature sealer failure that often cost homeowners more to fix later.
How often do grout sealers need to be reapplied?
Penetrating sealers last 3 to 5 years before resealing, while topical sealers typically need renewal every 1 to 2 years depending on traffic, moisture exposure, and the specific product used.