
Color sealing grout works when your grout is stained, discolored, or just the wrong shade for your updated space. It recolors the joints permanently and locks in stain resistance for years, not months. It won’t fix crumbling or missing grout, so the first move is always a close look at the grout’s actual condition before you commit.
TL;DR:
- Proper deep cleaning and repairing damaged grout are essential before applying color sealing to ensure durability and prevent early failure.
- Professional color sealing typically lasts 10 to 15 years, whereas DIY jobs often fail within a year due to inadequate prep and application errors.
- The most suitable situation for color sealing involves permanently stained, patchy, or mismatched grout, not structural damage or crumbling grout.
- Test patches under actual room lighting are crucial to confirm color match before full application, avoiding costly mistakes.
- Key conditions for longevity include full dry-out before sealing, adherence to cure windows, and ongoing use of pH-neutral cleaners; neglecting these shortens lifespan.
Table of Contents
- What Is Color Sealing Grout, and How Is It Different From a Clear Sealer?
- When Should You Color Seal vs. Repair or Regrout?
- How Does the Professional Color Sealing Process Actually Work?
- DIY vs. Professional: What Does It Actually Cost, and What Fails First?
- Prep and Aftercare: The Checklist That Determines How Long It Lasts
- How Carpet and Tile Plus Approaches Color Sealing Jobs
- How Do Popular Color Sealing Products Compare?
- What Should You Ask Before Hiring a Grout Color Sealing Service?
- What Are the Most Common Mistakes Homeowners and Pros Make?
- How Long Does a Color Sealing Project Actually Take?
- Is Color Sealing Worth It, or Just a Temporary Fix?
- Ready for a Quote on Grout Color Sealing?
- Sources
- FAQ
What Is Color Sealing Grout, and How Is It Different From a Clear Sealer?
Color sealing grout means applying a pigmented sealer directly onto the grout lines. The product bonds to the surface, changes the grout’s color, and seals it against moisture and dirt in one step. That’s a different job than a clear penetrating sealer, which soaks in and protects but leaves the original color exactly as it was, stains and all.
It’s also not paint. Paint sits on top and tends to chip or peel within a year if the surface wasn’t prepped correctly. A quality color sealer is formulated to bond into the porous grout structure, which is why manufacturers market these products as both colorant and protective sealer in a single application.
You’ll typically see two categories on the shelf:
- Epoxy-based color sealers — more rigid, more chemical-resistant, often used in commercial or heavy-wear settings.
- Acrylic-based color sealers — easier to apply, flexible enough for most residential floors and walls, and the more common choice for bathrooms and kitchens.
- Clear penetrating sealers — protect without changing color, a separate product for a separate goal.
When Should You Color Seal vs. Repair or Regrout?
Color sealing is the right call in specific situations, not every situation. Here’s how to sort it out:
- Permanent staining that cleaning won’t touch. If a deep clean still leaves dark grout lines around a shower floor or kitchen backsplash, color sealing restores a uniform look.
- Patchwork grout from past repairs. Mismatched grout color from a repair job years ago is one of the most common reasons homeowners call for color sealing.
- A straight-up color change. Updating a kitchen and want the grout to match new cabinets or tile? Color sealing does that without tearing anything out.
- Structural failure is a different problem. Cracked, crumbling, or missing grout needs repair or regrouting first. Sealing over damaged grout just locks the damage in place.
High-traffic floors and wet areas like showers deserve extra scrutiny here, because a color sealer applied over compromised grout in a shower will fail faster than the same product on a dry hallway floor.
How Does the Professional Color Sealing Process Actually Work?
A properly done job follows a set sequence, and skipping any one of these steps is usually where DIY jobs go wrong.
- Deep cleaning first. Technicians use alkaline cleaners and mechanical agitation to strip out grease, soap scum, and old sealer residue. Skip this step and the new sealer has nothing solid to grip.
- Repair and dry-out. Any cracked or missing grout gets patched, and the surface needs to dry completely, sometimes overnight, before sealant goes on.
- Color match and test patch. A small test patch gets applied and checked under the room’s actual lighting before committing to the whole floor. Room lighting changes how a color reads, and a test patch avoids an expensive surprise.
- Controlled application. The sealer goes on line by line, with tile faces wiped clean before it sets. A second coat often follows for even coverage.
- Cure and inspection. A final walk-through confirms even color and full coverage before the crew calls the job done.
Pro Tip: Ask your technician what happens in the first 72 hours after application. Reputable crews will tell you exactly when you can shower, walk on the floor, or mop again, because that window is where most early failures happen.
Properly applied color sealing in a residential setting commonly holds up for 10 to 15 years, a lifespan that’s hard to match with a shelf product applied without prep work.
DIY vs. Professional: What Does It Actually Cost, and What Fails First?
Professional color sealing typically runs somewhere between $1.50 and $7 per square foot, depending on how much cleaning and repair the job needs going in. A full bathroom floor and shower often lands in the low hundreds to a couple thousand dollars total once cleaning, repair, and sealing are all factored in.
DIY kits look cheaper on paper. An 8-ounce bottle of a consumer color seal product covers roughly 250 square feet of standard 12×12 tile, which sounds like plenty for a small bathroom. The gap shows up in durability. A well-prepped professional job lasts 10 to 15 years; many DIY jobs start peeling or wearing thin within a year, usually because of:
- Skipping the deep clean, so the sealer bonds to residue instead of grout.
- Using a non-shower-rated product in a wet area.
- Letting excess pigment dry on the tile face, leaving a hazy stain that’s tough to remove.
Small, low-traffic decorative areas like a laundry room backsplash are reasonable DIY territory. Showers, kitchen floors, and any commercial space are where the pro investment pays for itself.
Prep and Aftercare: The Checklist That Determines How Long It Lasts
What you do before and after sealing matters as much as the sealing itself.
- Deep clean everything first. Old soap film, sealer residue, and grease all block adhesion. Grout cleaning has to happen before color goes on, not after.
- Dry completely. Trapped moisture under a fresh seal coat is a common cause of early discoloration.
- Repair cracks and gaps. Patch first, seal second. Never the reverse.
- Run a test patch. Confirm color and finish before treating the whole surface.
- Respect the cure window. Keep the area dry and foot traffic light for the first 24 to 72 hours, depending on the product and room ventilation.
- Clean with pH-neutral products going forward. Soft brushes and neutral cleaners protect the seal; harsh scrubbing wears it down early.
- Never use acid or abrasive cleaners. Not once, not “just this one time.” These strip pigment and shorten the sealer’s life permanently.
Touch-ups every few years in high-wear spots, like in front of a kitchen sink, keep the whole floor looking consistent without a full redo.
How Carpet and Tile Plus Approaches Color Sealing Jobs
The company has significant experience working on carpets, tile, and grout, which shows up most in how the prep gets handled. As a family-owned business, the crews follow the same sequence outlined above: clean thoroughly, repair what’s damaged, match color with a test patch, apply carefully, then let it cure.
Technicians use organic cleaning products throughout the process, and the low-moisture approach behind the company’s one-hour dry time carries over into grout work, meaning less downtime waiting for floors to be usable again. When you request an estimate, expect a straightforward walk-through of your grout’s condition, a realistic timeline, and clear instructions for the first few days after the job, so there’s no guessing about when it’s safe to shower or mop.
How Do Popular Color Sealing Products Compare?
Homeowners shopping for a DIY option will run into a handful of recurring product types, each with tradeoffs worth knowing before you buy.
Pigmented penetrating colorants, the category that includes Color Seal, are sold in sizes from a couple of ounces up to a gallon. Manufacturers pitch them as a two-in-one colorant and sealer, and they tend to hold up better than surface coatings because the pigment bonds into the grout rather than sitting on top of it. The tradeoff is technique: uneven application shows up as blotchy color, especially on wider grout lines.
Epoxy-based colorants are the toughest option chemically, standing up well to grease and heavy scrubbing, which is why they show up more often in commercial kitchens. They’re also less forgiving to apply. Epoxy sets fast and doesn’t allow much room for correction once it’s on the grout.
Grout paints or surface coatings are the cheapest option at the hardware store, and also the least durable. Because they sit on the surface instead of bonding into it, they’re the products most likely to peel within a year, particularly in showers or anywhere that sees regular water exposure.
Clear penetrating sealers aren’t a color product at all, but they get lumped into the same shopping aisle. They protect grout without changing its appearance and typically need reapplication every one to three years, a much shorter cycle than a properly applied color sealer. If your grout looks fine and you just want ongoing protection, that’s the product you want, not a colorant.
What Should You Ask Before Hiring a Grout Color Sealing Service?
A few pointed questions separate a solid contractor from one who’ll leave you redoing the job in a year.
Ask what the estimate actually includes. A number that only covers the sealing step, without cleaning or repair, is a lowball that doesn’t reflect the real cost of a durable result. Ask whether they run a test patch before committing to the full space, and whether they’ll show you the color under your room’s actual lighting rather than a sample chip under shop lights.
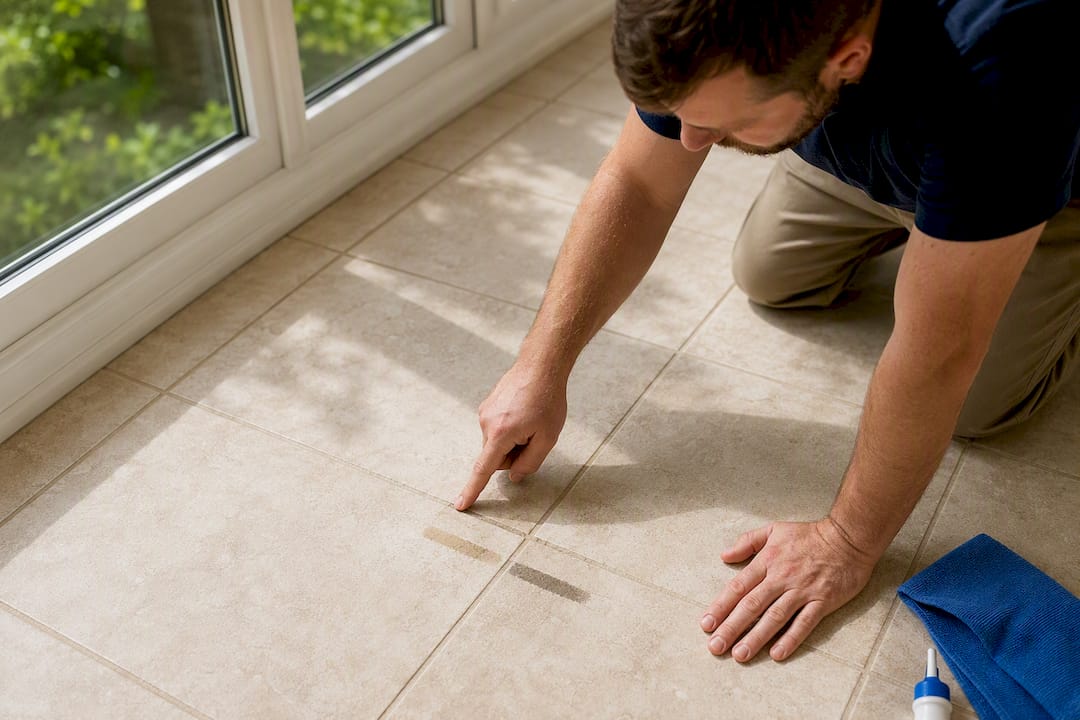
Find out what cure time they’re planning around and what restrictions you’ll have on water and foot traffic during that window. A contractor who can’t give you a specific number, somewhere in the 24 to 72 hour range depending on conditions, hasn’t done this enough times to know their own product.
Ask about certification. IICRC-certified technicians have gone through standardized training on cleaning and restoration methods, which matters more in grout work than most homeowners realize, since improper cleaning chemistry can damage tile finishes before the color sealer ever goes on. Ask what products they use and whether they’re rated for wet areas if that’s where the work is happening. Finally, ask about warranty or guarantee terms in writing, not verbally. A contractor confident in their process will put it on paper without hesitation.
What Are the Most Common Mistakes Homeowners and Pros Make?
The single biggest DIY mistake is skipping or rushing the cleaning stage. Sealer applied over soap scum, grease, or old sealer residue looks fine for a few weeks, then starts flaking because it never actually bonded to the grout underneath.
The second most common error is picking the wrong product for the location. Using a non-shower-rated colorant in a wet area, or a decorative-grade product on a high-traffic kitchen floor, sets the project up to fail early regardless of how carefully it’s applied.
On the professional side, red flags look different. Watch for a contractor who skips the test patch entirely, since that step is what prevents an entire floor from coming out the wrong shade. Be cautious of anyone quoting a price without seeing your grout’s actual condition in person or in photos, because hidden damage changes the scope significantly. And be skeptical of a quote that seems unusually low compared to others. Grout color sealing done right involves real labor in cleaning and repair, and a price that skips those steps is a price that skips the work.
One more thing worth checking either way: ask what happens if the color doesn’t match after curing. A reasonable answer involves touch-up work at no extra charge. No answer, or a defensive one, tells you what kind of experience you’re signing up for.
How Long Does a Color Sealing Project Actually Take?
The full timeline runs longer than most homeowners expect, mostly because of drying and curing, not the application itself.
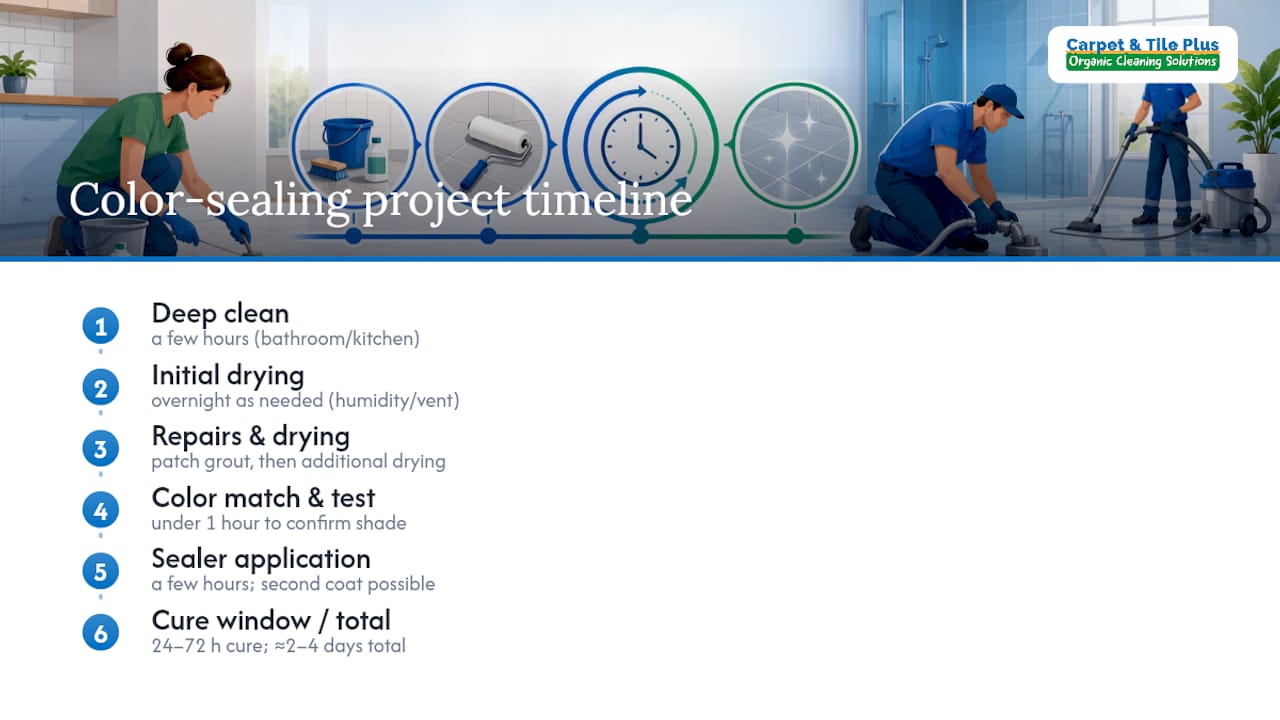
Deep cleaning typically takes a few hours for an average bathroom or kitchen, longer for larger commercial spaces. After cleaning, the grout needs to dry fully before anything else happens, which can mean waiting overnight depending on humidity and ventilation. Any repair work, patching cracked or missing grout, adds another drying period before sealing can start.
The color matching and test patch step is quick, usually well under an hour, but it’s a step worth not rushing since it’s your one chance to catch a color mismatch before it’s on the whole floor. Actual application of the color sealer, once everything’s prepped, generally takes a few hours for a standard bathroom, depending on square footage and whether a second coat is needed.
Then comes the part that actually determines how long the whole project stretches out: the cure window. Most jobs need 24 to 72 hours before the area can handle water or regular foot traffic again. Add it up, and a straightforward bathroom project runs about two to four days from first cleaning to a fully cured floor you can use normally. Larger or more damaged spaces stretch that timeline out further.
Is Color Sealing Worth It, or Just a Temporary Fix?
The conventional advice online treats grout sealing as a single category, and that’s where most homeowners get steered wrong. Clear sealer and color sealer solve different problems, and a lot of guides gloss over that distinction entirely. If your grout looks fine and you just want to keep it that way, a clear sealer does the job. If it’s already stained, patchy, or the wrong color for your space, no amount of clear sealer fixes that. You need pigment.
What gets consistently underestimated is how much the prep work determines the outcome. Homeowners shopping for DIY kits focus on the bottle, the coverage numbers, the price per square foot. Almost none of that matters if the cleaning step gets rushed. A $15 bottle of color sealer applied over grease and soap residue is money spent on a coating that’s going to flake within a year.
My honest read: if you’re dealing with a small, dry, low-traffic spot, a DIY kit is a reasonable gamble. Everywhere else, especially showers and kitchen floors, the labor and expertise behind a professional job is what actually buys you the 10 to 15 year lifespan people want when they start this project in the first place.
— Jim
Ready for a Quote on Grout Color Sealing?
Getting an accurate estimate for grout color sealing takes about the same effort as sending a few text photos. Snap pictures of the affected grout lines in natural light, jot down a rough square footage for the room, and note anything specific, like a stubborn stain by the shower drain or a patch job from a previous repair. That’s enough for Carpet and Tile Plus to give you a real number instead of a guess.

Every estimate for residential tile and grout cleaning and grout sealing walks through the same process covered above: a deep clean to strip out residue, repair of any damaged grout, a test patch so you approve the color before full application, and a clear explanation of cure time so you know exactly when your floors are back in regular use. IICRC-certified technicians handle the work with organic cleaning products, and the low-moisture methods behind the company’s one-hour dry time carry through into the grout process. If your grout has seen better days, request an estimate and get a straight answer on what it’ll take to fix it.
Sources
Before buying a DIY kit or booking a pro, check manufacturer pages for shower-rating and cure-time specifics, like the Color Seal product line and coverage details from Groutshields. For color coordination beyond the grout itself, guidance on interior color choices can help you match trim and tile tones.
- Color Seal
- Color Seal – 8oz Bottle – Covers up to 250 sq. ft. of 12×12 tiles
- Grout Color Sealing — DC, MD, VA | Rose Restoration
- Grout Color Sealing vs Regular Sealing | Lazona
FAQ
Is Color Sealing Grout a Good Idea?
Yes, for grout that’s stained, discolored, or just the wrong shade for an updated room. It restores a uniform look and adds stain resistance, though it isn’t a fix for structurally damaged grout that needs repair first.
How Long Does Grout Color Sealer Last?
Properly applied by a professional, color sealer commonly lasts 10 to 15 years in a residential setting. Many DIY applications last a year or less, usually because of skipped cleaning or prep steps.
Can Grout Be Sealed With Color?
Yes, pigmented color sealers are specifically made to recolor grout while sealing it against moisture and stains in one product. This differs from a clear penetrating sealer, which protects the grout without changing its color.
What Are the Disadvantages of Sealing Grout With Color?
The main downside is that poor prep, like skipping the deep clean or rushing the dry-out period, causes premature peeling or uneven color. Color sealing also commits you to a specific shade, so a mismatched test patch is worth catching before full application.