
Porcelain and ceramic tile look nearly identical on the surface, but how ceramic tile differs from porcelain cleaning comes down to one thing: absorption. Porcelain’s vitrified body absorbs a very small amount of water, so spills sit on top until you wipe them away. Ceramic typically absorbs a moderate amount of water, meaning liquids can work their way into the tile body if the glaze chips or the grout fails. That single difference drives every cleaning decision below.
The practical rule: Porcelain tolerates simpler surface cleaning and shorter rinse steps. Ceramic demands stricter rinsing, consistent grout protection, and immediate attention to chips or cracks before moisture gets underneath.
Three things to act on right now, regardless of which tile you have:
- Use a pH-neutral tile cleaner every time. Acidic cleaners (vinegar, some bathroom sprays) etch glaze and degrade grout over time.
- Skip ammonia-based cleaners like Windex for routine tile and grout care. Colored formulations can stain light grout, and ammonia weakens cement grout with repeated use.
- Seal cement-based grout every 1–2 years. This single step prevents more staining problems than any cleaner on the market.
Table of Contents
- What makes ceramic and porcelain tile different?
- How porosity changes your cleaning approach
- What does a safe daily and weekly routine look like?
- How to remove stubborn stains without damaging the tile
- Why grout is the real maintenance weak point
- How chips and scratches change what you can clean
- How can you tell ceramic from porcelain at home?
- When should you call a professional cleaner?
- Key Takeaways
- What most homeowners get wrong about tile cleaning
- Professional tile and grout cleaning in the Northwest Suburbs of Chicago
- Useful sources and further reading
What makes ceramic and porcelain tile different?
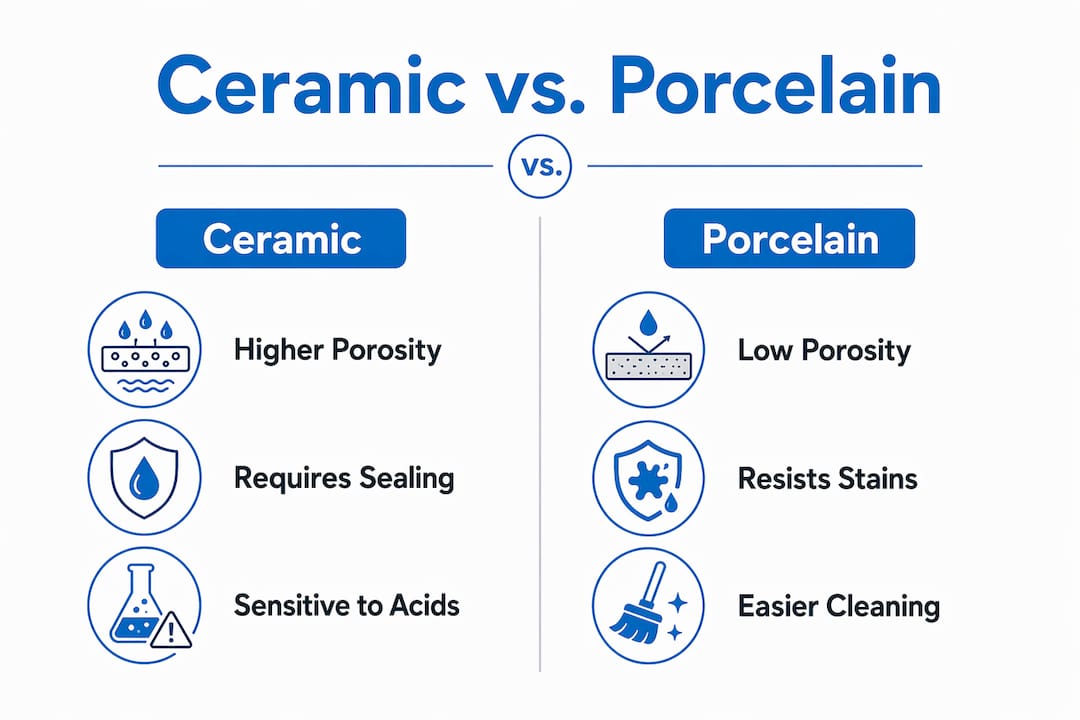
Both start as clay, but the manufacturing process splits them into two very different materials.
- Ceramic tile: Made from semi-coarse clay, fired at roughly 1,800–2,000°F. The result is a moderately dense tile, almost always finished with a protective glaze. That glaze is doing the heavy lifting on stain and water resistance. Common uses: bathroom walls, kitchen backsplashes, and low-traffic decorative applications.
- Porcelain tile: Made from finer kaolin clay, fired at 2,200–2,500°F. The higher heat vitrifies the body, making it dense and low-absorption throughout — not just at the surface. Common uses: bathroom floors, kitchen floors, outdoor patios, and any high-moisture or high-traffic area.
Porcelain is technically a subcategory of ceramic, but the Porcelain Tile Certification Agency (PTCA) draws a hard line at the 0.5% water absorption threshold. Below that number, it’s porcelain. Above it, it’s ceramic.
How porosity changes your cleaning approach
This is where the difference in tile cleaning becomes concrete and practical.
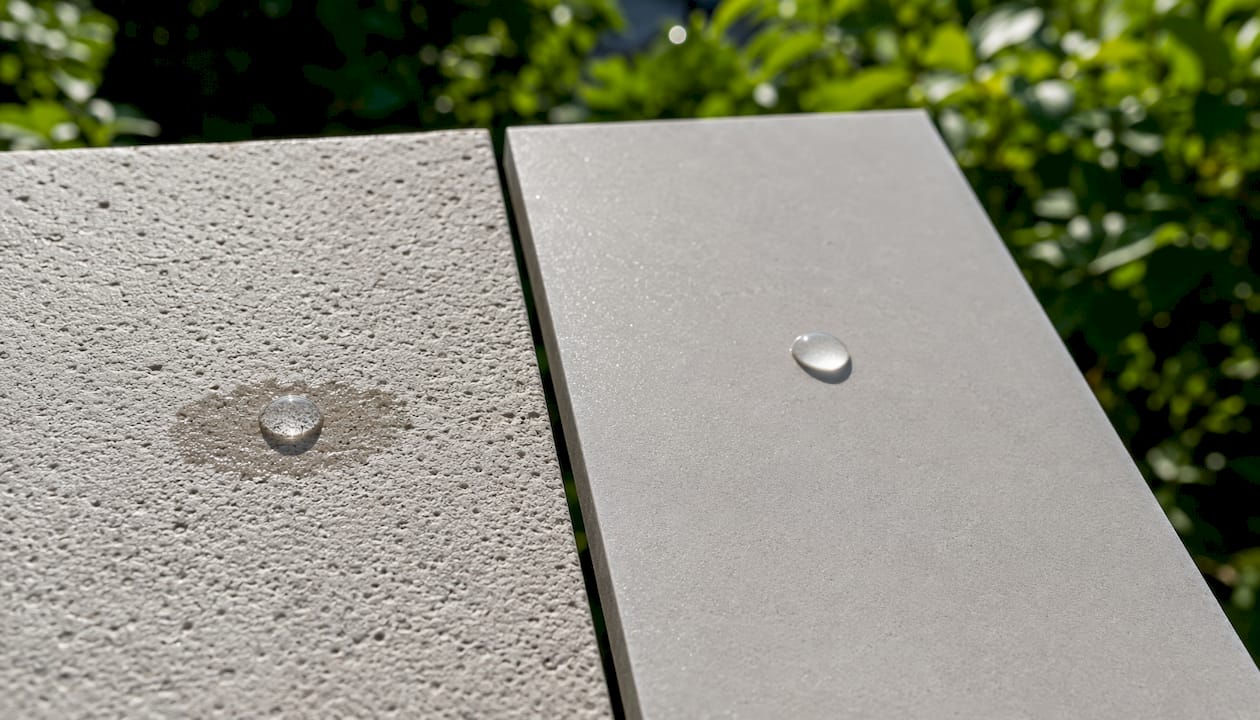
Porcelain’s dense, non-porous body resists absorption, so soils and liquids stay on the surface. A quick damp mop picks up most of what lands on it. Ceramic’s higher porosity means that anything that gets past the glaze — through a chip, a micro-scratch, or a grout joint — can penetrate the tile body and bond there.
What this means for daily cleaning:
- Porcelain: surface-level cleaning is usually enough. Spills don’t race the clock.
- Ceramic: spills on intact glaze are fine, but any breach in the glaze or grout turns a surface problem into a body stain.
- Hard-water mineral scale behaves differently too. On porcelain, it sits on top and responds to a mild acid treatment. On ceramic, scale can work into micro-surface texture and require longer dwell times.
Equipment settings matter more than most homeowners realize. Ceramic’s higher porosity, which varies in practical testing, means lower water pressure and moderated temperature are needed when machine-cleaning. Forcing high-pressure water into ceramic drives contaminants deeper into the body instead of lifting them out. Porcelain tolerates higher pressure and temperature settings without that risk.
Statistic to know: The ASTM standard and PTCA both set the porcelain threshold at less than 0.5% water absorption. Ceramic classified as “semi-vitreous” typically falls in the 0.5–3% range. That gap is why the two tiles need different cleaning protocols.
Glazed vs. through-body construction adds another layer. A glazed ceramic tile has a glass-like surface coating over a porous clay body. As long as that glaze is intact, cleanability is nearly identical to porcelain. The moment the glaze chips, the exposed clay body stains fast. Through-body porcelain, by contrast, carries its color and density all the way through. A chip on porcelain is a cosmetic issue. A chip on glazed ceramic is a maintenance problem.
What does a safe daily and weekly routine look like?
The answer-first version: sweep or vacuum, damp-mop with a pH-neutral cleaner diluted per the label, rinse with clean water, and dry. That routine works for both tile types. The differences are in the details.
Weekly cleaning steps:
- Sweep or vacuum to remove loose grit. Dragging grit across glazed ceramic with a mop is one of the fastest ways to create micro-scratches.
- Mix a pH-neutral tile cleaner at the manufacturer’s recommended dilution. Do not guess at concentration.
- Damp-mop the tile surface. For ceramic, use lighter pressure and less water than you would on porcelain.
- Agitate grout lines with a soft-bristle brush if they look dull or discolored.
- Rinse with clean water. Skipping the rinse leaves cleaner residue that builds up over time and reduces slip resistance on both tile types.
- Dry with a microfiber cloth or allow to air-dry in a ventilated space.
Products to use:
- pH-neutral tile and grout cleaners (widely available at hardware stores)
- Enzyme-based cleaners for organic soils like food grease or pet accidents
- Chlorine-free, low-VOC options for households with children, pets, or chemical sensitivities
Products to avoid for routine care:
- Ammonia-based cleaners (Windex and similar): can discolor grout and degrade sealant with repeated use
- Undiluted bleach: fine for occasional disinfection but strips grout sealant and can bleach colored grout
- High-alkaline strippers: designed for floor finish removal, not tile maintenance
- Vinegar or acidic sprays used regularly: etches ceramic glaze and damages cement grout over time
Pro Tip: Test any new cleaner on a small, out-of-sight area first. Let it dwell for the time the label recommends, then rinse and check for color change, dullness, or residue before applying it to the whole floor.
For tile surfaces that need special handling, such as textured porcelain or hand-painted ceramic, the same pH-neutral rule applies but a softer brush and shorter dwell time reduce the risk of surface damage.
How to remove stubborn stains without damaging the tile
Start with the least aggressive treatment that could work. Escalate only after a test confirms the method is safe.
Stain-by-stain approach:
- Grease and food oils: On porcelain, a surface degreaser with a short dwell time usually handles it. On ceramic, use a penetrating degreaser and allow a longer dwell so it can reach into any micro-texture before rinsing.
- Hard-water and mineral scale: A mild acid cleaner (phosphoric acid-based products, not vinegar) works on porcelain. On glazed ceramic, keep acid contact time short and neutralize immediately with a clean-water rinse to protect the glaze.
- Rust stains: Use a product specifically formulated for rust removal on tile. Always test first. Rust removers are aggressive and can affect grout color.
- Organic dyes (wine, coffee, juice): Act fast. On porcelain, blot and rinse. On ceramic, blot first, then apply a pH-neutral cleaner and a poultice if the stain has set into the body.
Step-by-step test-first procedure:
- Choose the appropriate cleaner for the stain type.
- Apply to a small, inconspicuous area.
- Allow the recommended dwell time.
- Neutralize with clean water if using an acid or alkaline product.
- Rinse thoroughly and evaluate. If the tile and grout look unchanged, proceed to the stained area.
- Escalate to a stronger method only if the test succeeds and the stain remains.
Safety rules that actually matter:
- Never mix cleaners. Combining bleach and ammonia-based products creates toxic fumes.
- Avoid long acid dwell times on glazed ceramic. The glaze can etch.
- For deep ceramic body stains, a poultice (absorbent powder mixed with a cleaning agent) draws the stain out rather than pushing it further in with scrubbing.
- Avoid abrasive pads on glazed ceramic. They scratch the glaze and create more surface area for future staining.
Pro Tip: On ceramic, avoid aggressive extraction or high-pressure rinsing over any chipped or cracked area. High pressure drives water and contaminants into the exposed clay body, making the stain worse and accelerating moisture damage underneath.
Why grout is the real maintenance weak point
Most homeowners blame the tile when the grout is the actual problem. Cement-based grout is porous by nature, and it collects soil, moisture, and mold spores regardless of whether the tile next to it is ceramic or porcelain. The tile type affects how much moisture reaches the grout, but the grout itself needs its own maintenance schedule.
Maintenance schedule that works:
- Spot-clean grout monthly in kitchens and bathrooms. A soft brush with a pH-neutral cleaner handles surface buildup before it sets.
- Deep-clean grout quarterly in high-traffic or wet areas. This is where effective grout cleaning methods make a real difference in long-term appearance.
- Seal cement-based grout every 1–2 years with a penetrating sealer. High-use or wet areas may need annual reapplication.
- After professional cleaning, follow the sealing sequence described in this grout sealing guide to lock in results.
Signs the grout needs more than cleaning:
- Persistent dark lines after correct cleaning (the stain is in the grout body, not on the surface)
- Grout powdering or crumbling at the surface
- Recurring mold that returns within weeks of cleaning
- Grout pulling away from tile edges
When any of those signs appear, cleaning alone won’t fix it. The grout needs resealing at minimum, and in many cases regrouting.
When to upgrade to epoxy grout: Commercial kitchens, wet rooms, and any installation where staining or mold keeps recurring are strong candidates. Epoxy grout is non-porous and doesn’t need sealing. The tradeoff is a harder installation and higher material cost. For property managers dealing with tenant turnover, the reduced maintenance burden usually justifies it. For moisture-related concerns that go beyond the grout itself, a mold assessment can identify whether the issue is surface-level or structural.
Understanding why bathroom tile grout needs sealing in wet areas is the first step toward preventing the most common tile maintenance failures.
How chips and scratches change what you can clean
Damage changes the rules. A chip on porcelain is mostly cosmetic because the through-body composition resists staining even when the surface is broken. A chip on glazed ceramic exposes the porous clay body underneath, and that exposed area will absorb moisture, oils, and dyes until it’s repaired.
Repair options by damage level:
- Small chips on glazed ceramic: DIY touch-up kits with color-matched epoxy filler work for minor cosmetic repairs. They seal the exposed body and stop further staining.
- Larger chips or color-match issues: A professional tile restorer can apply filler and blend color more accurately than most DIY kits allow.
- Widespread wear or multiple adjacent chips: Replacement is usually more cost-effective than repeated spot repairs. Persistent staining that resists extraction, or substrate and grout failure beneath the tile, are clear replacement indicators.
Cleaning adjustments for damaged tile:
- Avoid high-pressure extraction over chipped ceramic. It forces water and cleaning solution into the exposed body.
- Use a poultice rather than scrubbing on deep body stains in chipped areas.
- After any repair, reseal the surrounding grout to prevent moisture from working under the repaired area.
How can you tell ceramic from porcelain at home?
You don’t need to chip or cut anything. Three non-destructive checks work reliably.
- Look at the tile edge or a broken corner. Through-body porcelain shows the same color from face to back. Glazed ceramic usually reveals a different, lighter clay color beneath the glaze layer.
- Water drop test. Place a small drop of water on an inconspicuous area of the tile face (not the grout). Porcelain beads the water or absorbs it very slowly. Ceramic darkens the surface noticeably within a minute or two as the water absorbs. Dry the area quickly after testing.
- Check the packaging or ask your installer. The box or spec sheet will list the PEI rating and water absorption percentage. A figure below 0.5% confirms porcelain per ASTM and PTCA standards. A PEI rating of 1–2 almost always indicates ceramic intended for wall or light-use applications.
If none of those checks give a clear answer, document the tile with photos and ask a flooring professional or your tile installer. Getting the identification right matters because the wrong cleaning method on the wrong tile type causes real damage.
When should you call a professional cleaner?
DIY cleaning handles routine maintenance well. These situations call for professional help.
Decision checklist:
- Grout staining that persists after correct cleaning with the right products
- Deep ceramic body stains that don’t respond to poultice treatment
- Large-area efflorescence (white mineral deposits rising through grout or tile)
- Hard-water haze covering significant floor area
- Chipped ceramic tiles where the exposed clay body has absorbed staining
- Outdoor tile with freeze-thaw damage or widespread grout cracking
What a professional visit looks like:
- Surface assessment: the technician identifies tile type, grout condition, and problem areas.
- Test cleaning: a small area is treated first to confirm the method is safe and effective.
- Method selection: options include steam extraction, poultice application, restorative cleaning, or regrouting depending on the findings.
- Service and timeline: most residential jobs are completed in a single visit; heavily soiled or damaged installations may need a follow-up sealing appointment.
IICRC-standard cleaning practices require technicians to adjust equipment pressure and temperature for the specific tile type. Ceramic gets lower pressure to avoid driving contaminants into its porous body. Porcelain tolerates higher settings. That calibration is something most homeowners can’t replicate with consumer equipment.
For property managers: Before the technician arrives, clear the area, photograph problem zones, and note the tile type if you know it. Ask for a written scope of work and before-and-after photos. For high-traffic commercial tile, scheduling professional cleaning on a documented cycle protects both the installation and the maintenance record.
Key Takeaways
Porcelain’s sub-0.5% water absorption keeps spills on the surface; ceramic’s higher porosity demands stricter grout protection, careful rinsing, and immediate chip repair to prevent body staining.
| Point | Details |
|---|---|
| Porosity drives everything | Porcelain absorbs less than 0.5% water; ceramic absorbs 0.5–3%, making grout and glaze protection critical. |
| pH-neutral cleaner, always rinse | Use a pH-neutral cleaner on both tile types and always follow with a clean-water rinse to prevent residue buildup. |
| Seal grout every 1–2 years | Cement-based grout needs a penetrating sealer on a 1–2 year cycle; epoxy grout skips sealing entirely. |
| Chips change the cleaning rules | A chip on ceramic exposes porous clay that stains fast; avoid high-pressure cleaning over any damaged area. |
| Carpetandtileplus for professional care | IICRC-certified technicians serving the Northwest Suburbs of Chicago adjust equipment settings for ceramic vs. porcelain and include grout sealing after deep cleaning. |
What most homeowners get wrong about tile cleaning
The conventional wisdom is that porcelain is easy and ceramic is hard. That’s an oversimplification that leads to real mistakes.
Here’s what actually matters: if the glaze on ceramic is intact, the two tiles clean almost identically. The difference becomes critical only after damage, grout failure, or years of wrong products. The homeowners who end up with permanently stained grout or etched tile almost always got there through one of three routes: regular vinegar use, Windex on grout, or skipping the rinse step.
Vinegar is the one that surprises people most. It feels natural and safe, so homeowners use it constantly. But acidity etches ceramic glaze gradually and degrades cement grout faster than most commercial cleaners. The tile looks fine for a year, then suddenly the grout is crumbling and the glaze has a dull haze that won’t buff out. By then, the damage is done.
Windex on grout is a similar slow burn. The ammonia content weakens cement grout over time, and colored Windex formulations can leave a tint on light-colored grout that no amount of scrubbing removes. It’s not a one-time disaster. It’s a six-month problem that shows up as a two-year repair bill.
The rinse step is the one professionals notice most. Homeowners skip it because the floor looks clean. But cleaner residue left on tile reduces slip resistance, attracts new soil faster, and builds up into a film that makes the floor look perpetually dull. Rinse every time.
Professional tile and grout cleaning in the Northwest Suburbs of Chicago
Reading the right routine is one thing. Having a technician who actually knows the difference between ceramic and porcelain, and adjusts the equipment accordingly, is another.

Carpetandtileplus provides residential tile and grout cleaning and commercial tile and grout cleaning across the Northwest Suburbs of Chicago, including Elgin, Bartlett, Streamwood, Arlington Heights, Palatine, Barrington, and Hanover Park. Every technician is IICRC-certified and uses organic, chlorine-free cleaning products. Equipment pressure and temperature are calibrated to the tile type on every job. Grout sealing is available as a follow-on service after deep cleaning, so you leave with a protected surface, not just a clean one.
Property managers handling tenant turnover, large stained areas, or recurring grout mold get the most from a professional visit. So do homeowners with older ceramic installations where the glaze is showing wear or the grout hasn’t been sealed in years. To book a service or get an estimate, contact Carpetandtileplus with your approximate square footage, photos of problem areas, and tile type if you know it. The team will assess the job and give you a clear scope before any work begins.
Useful sources and further reading
The claims in this article draw from manufacturer care guidance, industry standards, and professional cleaning references. Key sources:
| Source | What it covers |
|---|---|
| Daltile tile care guide | Step-by-step care for ceramic and porcelain; rinse step importance; cleaner safety cautions |
| This Old House: ceramic vs. porcelain | PTCA/ASTM absorption standards; PEI ratings; manufacturing differences |
| Wolfe Flooring ceramic guidelines | Ammonia and Windex risks for grout; stain removal guidance |
| JMS Enterprises: method differences | Equipment pressure/temperature settings; porosity ranges in practical testing |
| CeramicInfoSpot comparison guide | Grout sealing cadence; epoxy grout recommendation; glaze-intact cleanability insight |
| Foreverbuilt: porcelain vs. ceramic | Absorption percentages; pH-neutral maintenance; grout as primary failure point |
Additional resources:
- Porcelain Tile Certification Agency (PTCA) at ptcaonline.org for absorption certification standards
- Chicago Home Inspect LLC home maintenance blog for broader guidance on tile longevity and building maintenance
- Carpetandtileplus internal guides on grout cleaning preparation and post-cleaning sealing procedures