
Cleaning your air ducts can help, but it’s rarely the main fix for a dusty house. Most household dust comes from a leaky duct system, a weak or overdue filter, and low fan run time, not from dirt hiding inside the metal. Start with three moves: install a MERV 8 to 11 pleated filter and replace it on schedule, run your blower fan on “Circulate” instead of “Auto,” and inspect your registers and visible ductwork for gaps. Call a professional only if you see mold, pest debris, or ducts actively blowing dust into rooms.
TL;DR:
- Upgrading to a MERV 8 to 11 pleated filter and replacing it every 60 to 90 days significantly reduces household dust caused by leaky ducts and filter inefficiencies.
- Sealing duct gaps and running the blower fan on “Circulate” helps prevent unfiltered outdoor particles from entering the system and minimizes dust buildup.
- Professional duct cleaning is generally unnecessary unless there are signs of mold, pests, or visible debris discharge, with proper cleaning involving source removal and verification testing.
- Leaks in ductwork, especially in attics or basements, are the main source of dust infiltration, and sealing these leaks yields more dust reduction than duct cleaning alone.
- Consistent maintenance, including regular filter checks, register cleaning, and annual HVAC inspections, is key to controlling dust in the home effectively.
Table of Contents
- Your Duct Dust Checklist: What To Do This Week
- Why Do Ducts Collect So Much Dust in the First Place?
- DIY Duct Maintenance That Actually Moves the Needle
- When Do Duct Leaks Become a Real Dust Problem?
- When Should You Actually Hire a Professional Duct Cleaner?
- What Does a Properly Cleaned Duct System Actually Involve?
- How Do You Vet a Duct Cleaning Contractor and Avoid Getting Burned?
- Building a Simple Maintenance Schedule That Sticks
- What I’ve Learned From Chronically Dusty Homes
- Ready for Professional Duct Cleaning in the Northwest Suburbs?
- Sources
Your Duct Dust Checklist: What To Do This Week
Work through these steps in order. Each one addresses a different way dust gets into your living space, and together they cover most of what drives a chronically dusty home.
- Upgrade your filter. A MERV 8 to 11 pleated filter traps far more household dust than the thin fiberglass filter that came with your system, and it fits the same slot.
- Set a replacement reminder. Check filters monthly and swap them every 60 to 90 days, sooner if you have pets or allergy sufferers at home.
- Switch your fan setting. Running the blower on “Circulate” pushes air through the filter more often instead of sitting idle between heating and cooling cycles.
- Vacuum your registers and return grilles. Dust settles fastest right at these openings, and a quick pass with a vacuum brush attachment removes visible buildup in minutes.
- Check for gaps at duct joints and boots. Foil tape works as a temporary patch; call a technician for anything beyond a small seam.
- Keep indoor humidity between 30 and 50 percent. Particles settle out of the air faster in that range instead of drifting and resettling on surfaces.
Pro Tip: Keep a spare filter on hand so you actually swap it on schedule instead of pushing it back another week because you’re out of stock.
Why Do Ducts Collect So Much Dust in the First Place?
Return registers get dusty faster than supply vents because that’s where your entire home’s air gets pulled back into the system. Every time your blower runs, it draws air (and whatever is floating in it, skin flakes, fabric fibers, pet dander, tracked-in soil) through the return grille and into the ductwork. That’s normal. The problem starts when the system pulls in more than it should.
Leaky ducts are the biggest culprit most homeowners never suspect. If your ductwork runs through an attic, crawlspace, or unfinished basement, gaps at the seams let unfiltered air from those spaces sneak directly into the airstream, bypassing your filter entirely. Those are insulation fibers, attic dust, and outdoor particulate getting a free pass into your living space. A well-documented practical HVAC guide on reducing household dust notes that sealing these leaks and improving filtration does more to cut dust than duct cleaning by itself.
Dirty coils and a grimy blower wheel make things worse by recontaminating clean air after it passes the filter. Dust and debris on the evaporator coil or blower blades gets picked up and redistributed every time the fan cycles, which is why some homes stay dusty even with a fresh filter installed. Humidity plays a role too. In dry air, dust particles stay airborne longer and travel farther before settling, which is part of why homes feel dustier in winter when heating systems run constantly and indoor humidity drops.
DIY Duct Maintenance That Actually Moves the Needle
Most of the heavy lifting against duct dust happens without ever cracking open a vent cover. Here’s the order that gets you the most improvement for the least effort.
- Pick the right filter rating. MERV 8 filters catch pollen, dust mites, and mold spores. MERV 11 steps up to pet dander and finer particulate. Anything above MERV 13 usually needs a system rated for the extra airflow resistance, so check your HVAC manual before jumping higher. According to HVAC-focused guidance on household dust, MERV 8 to 11 filters deliver the biggest practical dust reduction for a typical residential system without straining the blower.
- Confirm the filter actually fits. A filter that’s too small lets air bypass it around the edges, which defeats the purpose. Measure the frame, don’t just trust the size printed on the old filter.
- Switch your thermostat fan setting. “Circulate” runs the blower for a set number of minutes each hour even when your system isn’t actively heating or cooling, filtering air more consistently. Expect a modest bump in electricity use, generally a small addition to monthly HVAC costs depending on your system and rates, but the tradeoff is fewer dust cycles.
- Clean accessible registers and returns. Pop off the grille, vacuum both sides, and wipe with a damp cloth. Skip anything that requires removing ductwork or reaching past the first few inches. That’s a job for a technician.
- Add humidity control if your home runs dry. A whole-house humidifier or a portable unit in dry months keeps particles heavier and less likely to stay suspended. In humid climates or seasons, a dehumidifier does the opposite job, keeping mold and dust mites from thriving.
Filtration and airflow habits, not the duct interior itself, tend to make the biggest dent in dust levels. Sealing leaks and upgrading filters address where the problem actually starts.
When to stop DIY: if you’ve upgraded your filter, run the fan more, sealed the leaks you can reach, and you’re still seeing visible dust discharge from vents, that’s your cue to bring in a professional rather than keep guessing.
When Do Duct Leaks Become a Real Dust Problem?
Duct leaks do two things at once: they let unfiltered air in, and they let conditioned air escape before it reaches your rooms, which is why a leaky system often runs longer to hit the same temperature. Homes with leaky attic or crawlspace ductwork tend to show more dust at supply registers, higher energy bills, and rooms that never quite reach the thermostat setting. Visible dust streaks near duct seams, a whistling sound at connections, or a home that stays humid or dusty despite a clean filter are all signs worth investigating.
Diagnosis ranges from a flashlight-and-visual-inspection job any homeowner can attempt on accessible ductwork to a professional duct blaster test, which pressurizes the system to measure exactly how much air is escaping and where. The visual check catches obvious gaps at joints and boots. The pressure test catches the hidden leaks inside walls and floors that account for a large share of total duct leakage in older homes.
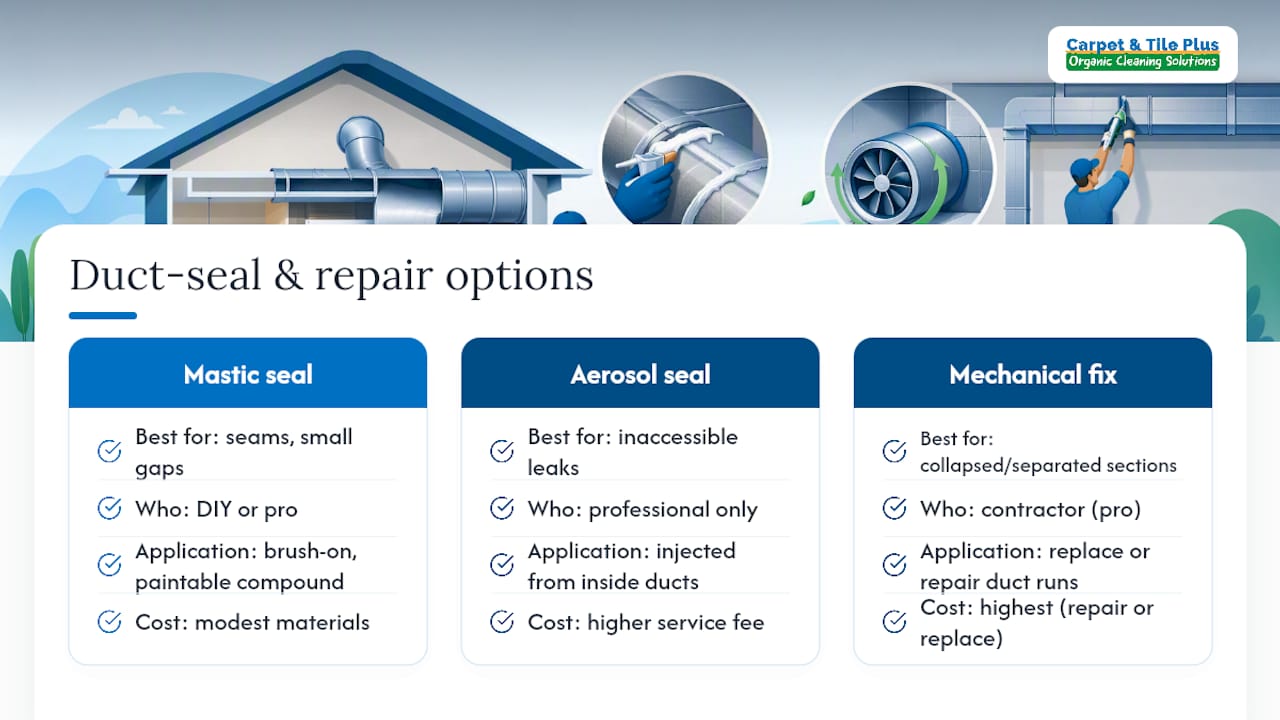
Sealing methods vary by severity. Mastic sealant, a paintable compound applied by brush, handles most seams and small gaps at a modest material cost for a DIY job. Aerosol duct sealing, applied by a professional from inside the system, reaches leaks in inaccessible sections and typically costs more but covers ground a homeowner physically can’t. Mechanical fixes, replacing collapsed flex duct or crushed sections, usually mean calling in a contractor. If more than a small percentage of your ductwork shows damage, or if sections have separated entirely, replacement is often more cost-effective than repeated patch jobs.
When Should You Actually Hire a Professional Duct Cleaner?
The EPA is direct on this point: routine duct cleaning has never been shown to prevent health problems, and controlling moisture while maintaining filters and coils does more for indoor air than a cleaning service on a fixed schedule. That doesn’t mean cleaning is never warranted. It means the decision should be based on specific evidence, not a calendar.
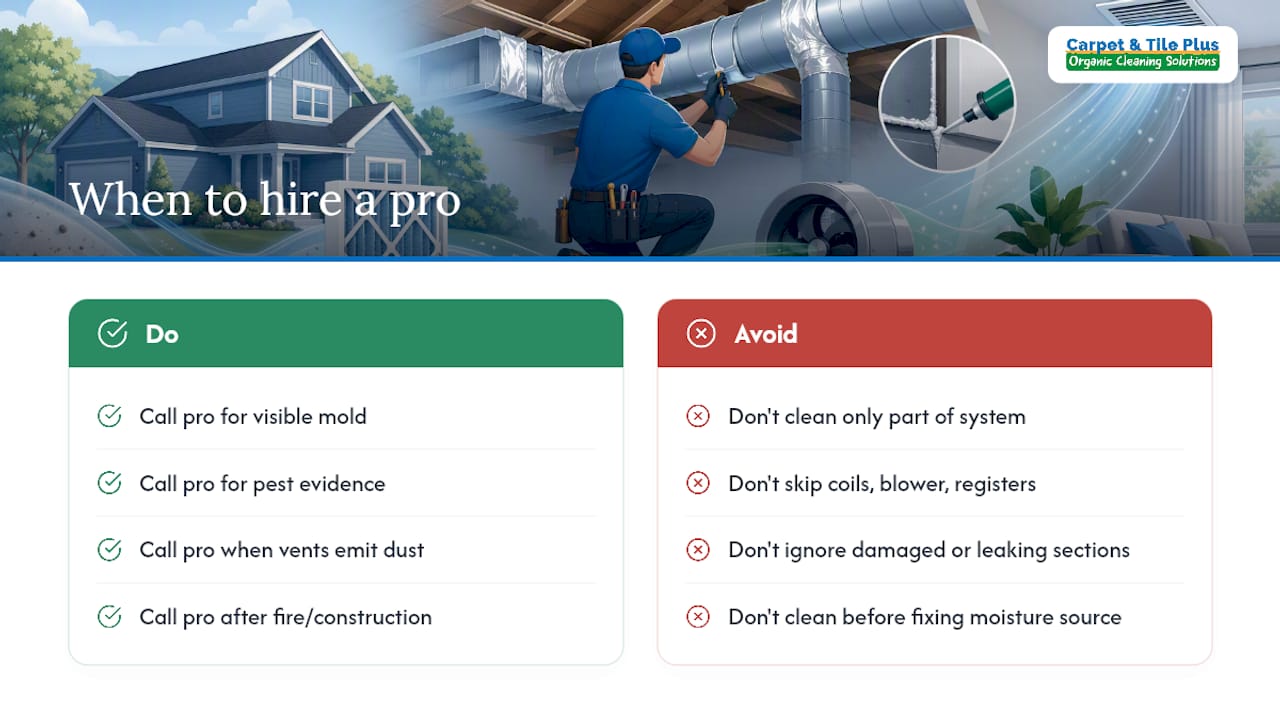
Call a professional when you see mold growth inside ducts or on other HVAC components, when there’s evidence of rodents or insects (nests, droppings, dead pests) in the system, or when ducts are clogged enough that they’re visibly discharging dust or debris into rooms after a vent is opened. Post-fire or post-construction contamination is another clear case, since ducts can trap soot, drywall dust, or sawdust that a filter change won’t touch. Research on measuring dust levels in residential ductwork backs these same triggers as the practical threshold for when cleaning helps.
Cleaning only part of a contaminated system rarely solves the problem. If contractors skip the coils, blower assembly, or registers, dust in those components recontaminates the freshly cleaned ducts within weeks. In some cases, the better fix isn’t cleaning at all. Severely damaged or leaking sections may need replacement, and moisture problems need to be resolved at the source before any cleaning holds.
What Does a Properly Cleaned Duct System Actually Involve?
NADCA’s standard for proper cleaning centers on source removal: mechanical agitation using brushes or air whips to physically dislodge dust and debris from duct interiors, combined with continuous negative pressure from a high-powered vacuum that captures everything as it’s loosened. That combination matters. Agitation alone just stirs contamination around; negative pressure alone misses debris that’s stuck to duct walls.
A legitimate job covers the whole HVAC system, not just the visible ductwork:
- Supply and return ducts, agitated and vacuumed under negative pressure
- Registers and grilles, removed and cleaned separately
- Coils and the blower assembly, since NADCA notes these components are frequent recontamination sources that homeowners rarely think to ask about
- Access points, sealed properly afterward to maintain system integrity
The industry benchmark for verifying the work is NADCA’s 2025 ACR standard, which defines assessment procedures, engineering controls, and two specific verification checks: a surface comparison test and a NADCA vacuum test, both designed to confirm ducts meet a measurable cleanliness threshold rather than just “looking better.” Ask whether your contractor performs either test after finishing.
Biocides and sealants are rarely necessary and, in most cases, aren’t appropriate for routine jobs. The EPA restricts biocide use inside ducts to specific, documented circumstances like active mold contamination, not as a standard add-on service. A contractor pushing sanitizing sprays as a routine upsell is worth questioning.
How Do You Vet a Duct Cleaning Contractor and Avoid Getting Burned?
Ask direct questions before you book anything, and don’t settle for vague answers.
- Ask if they’re NADCA-affiliated and whether their technicians follow the ACR standard for assessment and cleaning.
- Ask what method they use. You’re listening for mechanical agitation plus continuous negative pressure, not a shop vac run through the vents.
- Confirm the scope covers the whole system. Registers, coils, and the blower assembly should all be included, not just the visible duct runs.
- Ask what proof you’ll get afterward. Before-and-after photos or a stated verification test are reasonable to request.
Watch for a few consistent red flags: unusually low flat-rate pricing (often a bait-and-switch setup for upsells once they’re in your home), high-pressure pitches for “duct sanitizing” as a required add-on, and any mention of biocides or chemical treatments applied as routine practice rather than for a documented problem. Pricing legitimately varies based on system size, how contaminated it is, and how accessible the ductwork is, so a wide range between quotes isn’t automatically suspicious. A flat quote given without ever inspecting your system is.
Pro Tip: Get the inspection before you get the quote. A contractor who prices your job sight unseen has no way to know what your system actually needs.
Building a Simple Maintenance Schedule That Sticks
Dust control works best as a habit, not a one-time fix. Breaking it into monthly, quarterly, and annual tasks keeps it manageable and reduces how often you’ll need professional intervention at all.
- Monthly: check the filter under a light for visible buildup, and vacuum accessible registers and return grilles.
- Quarterly: replace the filter (or sooner with pets or allergy concerns), and visually inspect intake areas for dust streaking or gaps.
- Annually: schedule an HVAC tune-up that includes a coil and blower inspection, and consider a duct inspection if your home is older or you’ve noticed rising dust levels.
| Frequency | Task | Why it matters |
|---|---|---|
| Monthly | Check filter, vacuum registers | Catches buildup before it recirculates |
| Quarterly | Replace filter, inspect intakes | Keeps filtration effective, spots new leaks early |
| Annually | HVAC tune-up, coil and blower check | Coils and blowers are common recontamination points |
If you’re following this schedule and still seeing dust discharge from vents, visible mold, or a musty smell that housekeeping doesn’t fix, that’s the point to move from maintenance to a professional assessment.
What I’ve Learned From Chronically Dusty Homes
The homeowners who call about dust almost always assume the ducts themselves are the problem. In practice, the fix that actually works is usually a leaky return in the attic, a filter that’s two sizes too small for the slot, or a blower coil nobody’s looked at in years. Cleaning the ducts without addressing those things buys you a few weeks of relief at best.
That’s why some professional services use organic cleaning products and certified technicians who look at the whole system, not just the metal runs, and may aim for minimal dry time to avoid disruption in your home. Work through the checklist above first. If you’re still hitting the triggers that call for a professional, that’s when it makes sense to bring one in.
— Jim
Ready for Professional Duct Cleaning in the Northwest Suburbs?
If you’ve worked through the checklist, sealed the leaks you can reach, and you’re still seeing dust discharge, mold, or pest evidence in your ductwork, some professional companies offer comprehensive cleaning services. Certified technicians may use organic cleaning products and follow whole-system cleaning practices, covering registers, coils, and the blower assembly, not just the visible duct runs, to prevent rapid recontamination.

Booking is straightforward: we assess your system before quoting, explain what we find, and complete the work with a one-hour dry time so your home isn’t disrupted for a full day. If you’re in Elgin, Bartlett, Streamwood, Arlington Heights, Palatine, Barrington, or Hanover Park and you’ve hit the criteria for professional cleaning, visit our air duct cleaning service page to request an assessment and get a scope-based quote for your home.
Sources
- Should You Have the Air Ducts in Your Home Cleaned? | US EPA
- Proper Cleaning Methods | National Air Duct Cleaners Association (NADCA)
- How to Reduce Dust in Your Home Through HVAC – A Practical Guide