
Carpet pre-treatment, also called pre-spray or pre-conditioning, is the step where a targeted chemical solution is applied to carpet fibers before deep cleaning to break the bond between oils, grease, and embedded soil. Skip it, and extraction alone just moves dirt around. The IICRC S100 standard and Carpet and Rug Institute (CRI) guidance both treat preconditioning as a prerequisite for effective soil removal, not an optional add-on. Approximately 79% of the soil found in carpets consists of dry particulate matter, making thorough vacuuming before any liquid touches the fibers essential.
Three things to do before you start any deep clean:
- Vacuum slowly and thoroughly in overlapping passes to pull out dry soil before any liquid touches the fibers.
- Apply a pre-spray to traffic lanes and visible spots, and let it dwell before you run the machine.
- Extract while the fibers are still damp. Never let pre-treatment dry on the carpet.
Table of Contents
- Why skipping pre-treatment costs you more than a dirty carpet
- The three main pre-treatment methods and when to use each
- How to pre-treat your carpet before shampooing: a step-by-step checklist
- Choosing the right chemistry: pH, enzymes, and fiber compatibility
- Dwell time: how long to wait and why timing is everything
- When should you hire a professional instead of doing it yourself?
- Why does carpet look worse after shampooing? Common mistakes and fixes
- Key Takeaways
- The step most homeowners rush past
- Carpetandtileplus handles the hard part for Northwest Suburbs homeowners
Why skipping pre-treatment costs you more than a dirty carpet
Pre-treatment is what separates a genuinely clean carpet from one that looks clean for two weeks and then resoils faster than before. The CRI-205 Residential Cleaning Recommendations link proper preconditioning directly to manufacturer warranty compliance and professional cleaning outcomes. That matters if you have a newer carpet still under warranty.
Pre-treatment lets chemistry do the heavy lifting. Without it, the extractor is fighting bonded oils and compacted soil with water pressure alone — and water pressure alone rarely wins against grease that has been ground in for months.
When you skip pre-treatment, a few things happen. The extractor pulls surface soil but leaves the oily, sticky layer that bonds to the fiber base. That residue acts like a magnet for new dirt, and within days the carpet looks worse than before you cleaned it. Professionals call this rapid resoiling, and it is the most common complaint after a DIY shampoo job. Wicking is the other problem: moisture from extraction travels up through the backing and brings subsurface soils back to the surface as the carpet dries.
The practical benefits of doing it right are straightforward: better soil removal, less water needed during extraction, longer carpet life, and no sticky residue left behind. For high-traffic homes with kids or pets, those outcomes are the difference between cleaning every six months and cleaning every six weeks.
The three main pre-treatment methods and when to use each
Not every stain needs the same approach. Professionals use three primary methods, often in combination.
Chemical pre-spray (pre-conditioner): A diluted alkaline solution applied across the entire carpet or targeted traffic areas. It emulsifies oils and suspends dry soils so the extractor can pull them out. This is the baseline method for general soil and traffic-lane buildup.
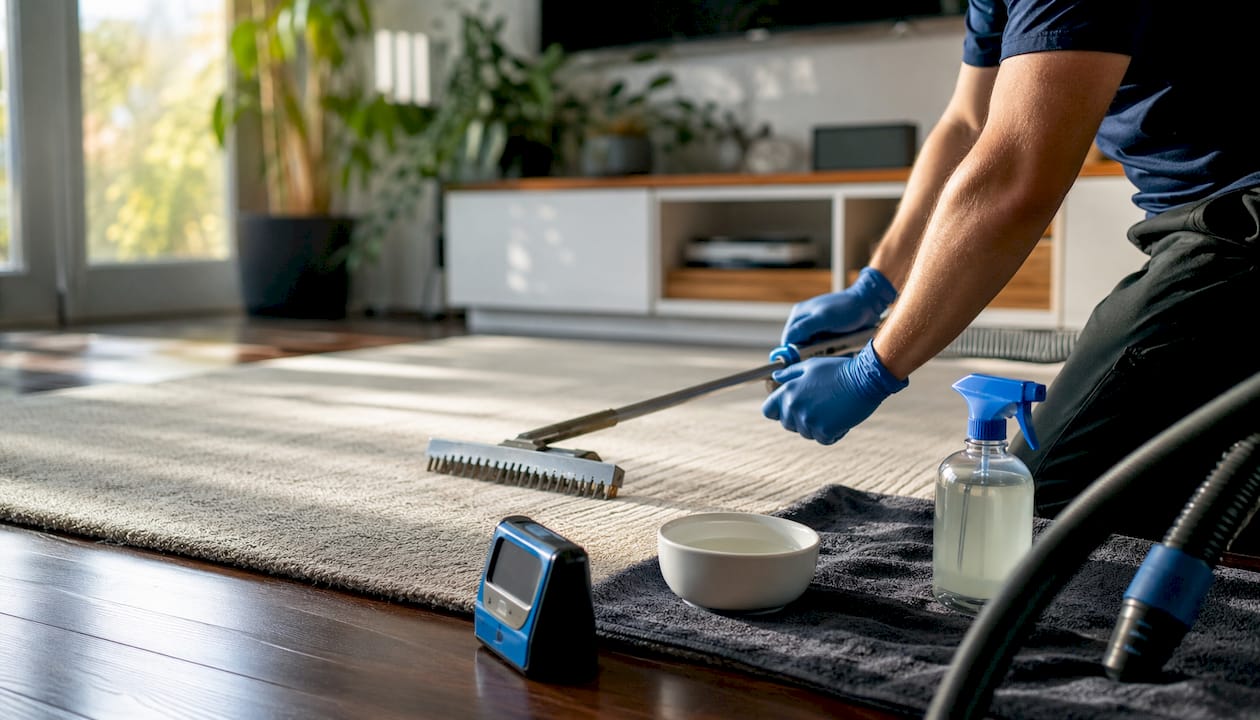
Mechanical agitation: A carpet rake, grooming brush, or rotary brush works the pre-spray into the fiber pile so the chemistry reaches all sides of each fiber strand. According to CRI preconditioning guidance, agitation distributes the solution uniformly and significantly improves suspension. Without it, the pre-spray sits on top of the pile and never contacts the soil at the fiber base.
Targeted spot and solvent treatment: Isolated stains like coffee, wine, pet urine, grease, or ink need a different chemistry than the general pre-spray. Enzymatic cleaners work best on organic stains (pet urine, food, blood) because the enzymes digest the organic compounds. Solvent spotters are better for grease, oil, and ink because they dissolve petroleum-based residues that water-based solutions cannot break down.
| Method | Best for | Typical dwell time | Caution |
|---|---|---|---|
| Alkaline pre-spray | Traffic lanes, general soil, oily buildup | 10–15 minutes | Avoid on wool; rinse with acidic neutralizer after |
| Mechanical agitation | All areas after pre-spray application | Applied during dwell | Use soft tools on delicate or loop-pile carpets |
| Enzymatic spotter | Pet urine, food stains, organic odors | 5–15 minutes | Do not mix with oxidizing agents |
| Solvent spotter | Grease, ink, adhesive residue | 3–5 minutes | Test on hidden area first; ventilate well |
| Oxidizing agent | Bleachable stains (some dye-based) | Per label | Professional use only; can strip carpet color |
A few stain-to-method examples worth knowing:
- Coffee and wine: alkaline pre-spray plus agitation, then extract promptly.
- Pet urine: enzymatic cleaner applied generously, allowed to fully dwell, then extract; follow with an acidic rinse to neutralize alkaline residue and odor compounds.
- Grease or cooking oil tracked in from a kitchen: solvent spotter first, then alkaline pre-spray over the area.
- Ink: solvent spotter applied with a clean white cloth, blotted outward from the center; never scrub.
How to pre-treat your carpet before shampooing: a step-by-step checklist
Follow this sequence every time, whether you are renting a machine or prepping for a professional visit.
- Inspect the carpet. Walk the room and note stain locations, traffic-lane boundaries, and any areas with visible matting or discoloration. Check the carpet’s condition before cleaning to identify fiber type and soiling level.
- Move furniture and protect legs. Clear as much of the room as possible. Place plastic or foam pads under metal furniture legs left in the room to prevent rust transfer.
- Vacuum slowly and thoroughly. Make overlapping passes in two directions. Use a crevice tool along baseboards. This step removes the dry particulate load—about 79% of overall carpet soil—which is why a slow, thorough vacuum is essential before pre-treatment.
- Pre-test your product. Apply a small amount of pre-spray to an inconspicuous area, wait 10–15 minutes, and check for color change, bleaching, or texture shift. This is non-negotiable for natural fibers and vividly colored rugs.
- Apply pre-spray evenly. Follow the manufacturer’s dilution instructions. Mist the solution across traffic lanes and soiled areas until fibers are damp but not saturated. Saturating the backing causes over-wetting, which leads to wicking and potential mold.
- Apply targeted spotters. Treat isolated stains with the appropriate spotter (enzymatic or solvent) before or immediately after the general pre-spray, depending on the product instructions.
- Agitate with a carpet rake or soft brush. Work the solution into the pile with slow, overlapping strokes. This step is what gets chemistry to the fiber base where soil actually lives.
- Allow dwell time. Most professional-grade pre-sprays need 10–15 minutes to suspend common soils. Set a timer. If the area starts to look dry before time is up, lightly mist it.
- Extract immediately while fibers are still damp. Run the machine in slow, overlapping passes. Overlap each pass by about 50% for complete coverage.
- Apply a neutralizing rinse if you used an alkaline pre-spray. A neutralizing acidic rinse after alkaline pre-treatment prevents sticky residues and rapid resoiling. This step is what separates repeatable clean results from a one-time improvement.
- Groom and set drying. Rake the pile in one direction to help fibers dry upright. Open windows, run fans, or use a dehumidifier. Aim for full dry time before foot traffic resumes.
Timeline summary: Vacuum (15–30 min) → Pre-spray and spot treat (5–10 min) → Dwell (10–15 min) → Extract (varies by room size) → Neutralize → Dry (1–4 hours depending on method and airflow).
Pro Tip: Always pre-test, even with products you have used before. Carpet dyes can shift over time, and a product that was safe on your carpet two years ago may react differently after sun exposure or previous cleaning residue has altered the fiber chemistry.
Safety checklist before you start:
- Open windows or run a fan for ventilation, especially with solvent-based spotters.
- Wear nitrile gloves when handling concentrated pre-spray solutions.
- Keep pets and children out of the area until the carpet is fully dry.
- Read the SDS (Safety Data Sheet) for any concentrated product. The EPA’s Safer Choice program lists pre-treatment products that meet safety and environmental standards.
Choosing the right chemistry: pH, enzymes, and fiber compatibility
The pH of your pre-treatment product matters more than most homeowners realize. Alkaline solutions (pH 8–10) are effective at emulsifying oils and breaking down general soil. Acidic rinses (pH 5–6) neutralize alkaline residue after extraction and restore the carpet’s natural slightly acidic state. Using only the alkaline step and skipping the rinse is why many DIY cleans leave a sticky feel that attracts dirt within days.
Wrong pH on natural fibers causes permanent damage. Wool is the most sensitive: strong alkaline solutions above pH 10 can cause irreversible fiber degradation and color change. If you have wool carpet, use a product specifically formulated for wool, and always pre-test. For more detail on wool-specific cleaning, the fiber requires a near-neutral pH approach throughout.
| Fiber type | Recommended pH range | Product type | Do not use |
|---|---|---|---|
| Nylon (synthetic) | 8–10 alkaline pre-spray | General alkaline pre-conditioner | Strong oxidizers without pre-testing |
| Polyester (synthetic) | 8–10 | General alkaline pre-conditioner | High-heat extraction without testing |
| Olefin/polypropylene | 8–9 | Mild alkaline or neutral | Solvent-heavy spotters (can dissolve backing adhesive) |
| Wool / natural fiber | 5–8 (near neutral) | Wool-safe, pH-neutral formula | Alkaline solutions above pH 10; bleach; strong oxidizers |
| Silk / specialty fiber | 5–7 | Professional use only | Any DIY pre-spray; call a pro |
Enzyme vs. solvent: when to use which
Enzymatic cleaners contain biological agents that digest organic compounds. They work well on pet urine, food stains, and blood, but they need adequate dwell time and a temperature above about 50°F to activate. Do not mix enzymatic cleaners with oxidizing agents or strong alkaline solutions, as these deactivate the enzymes before they can work.
Solvent spotters dissolve petroleum-based residues that water-based chemistry cannot touch. They are the right call for grease, motor oil tracked in from a garage, lipstick, or ink. Ventilate well when using them, and blot rather than scrub to avoid spreading the stain.
Pro Tip: When buying a pre-treatment product at a U.S. home improvement store, look for the pH range on the label and a dilution ratio. A product with no listed pH and no dilution instructions is a red flag. Concentrated solutions applied at full strength are a leading cause of fiber damage and sticky residue.
Dwell time: how long to wait and why timing is everything
Most professional-grade pre-sprays need a short contact time to suspend common soils. That window is not arbitrary. The chemistry needs time to penetrate the fiber, emulsify the oil, and hold the soil in suspension so extraction can pull it out. Cut the dwell time short and you are extracting before the chemistry has finished its job.
Key timing rules:
- Standard pre-spray: 10–15 minutes for general soil and traffic-lane buildup.
- Enzymatic cleaner on pet stains: 10–15 minutes minimum; some heavy contamination benefits from a longer dwell, up to the product’s maximum.
- Solvent spotter: 3–5 minutes, then blot and extract. Do not let solvent-based products dwell too long on synthetic fibers.
- Never exceed the manufacturer’s maximum dwell time. Longer is not always better. Over-dwelling can over-wet the backing or leave residue that is harder to extract.
Rental machines present a specific challenge. Most consumer-grade carpet shampooers lack the high machine temperatures that truck-mounted professional systems deliver. Heat activates cleaning chemistry, so with a rental machine you are relying more heavily on dwell time and agitation to compensate. Apply the pre-spray, agitate, and give it the full 15 minutes before you run the machine. With a professional truck-mounted system, in-line metering and higher temperatures do more of the work, but dwell time still matters.
The single most damaging timing mistake: letting pre-treatment dry on the fibers before extraction. A dried pre-spray bonds to the fiber and leaves a sticky residue that is harder to remove than the original soil. If an area starts to dry out during a long dwell, lightly mist it with clean water to keep it damp.
One-room DIY timeline: Pre-spray application takes about 5 minutes for an average bedroom. Add 15 minutes dwell, 20–30 minutes extraction, and 1–2 hours drying with fans. Total active time: under an hour.
Full-home professional job: A professional crew pre-sprays room by room, agitates, and extracts in sequence so dwell time is built into the workflow. Dry time with a truck-mounted system and good airflow is typically around one hour per room.
When should you hire a professional instead of doing it yourself?
The science behind pre-treatment is the same whether you are doing it yourself or hiring a crew. Professionals call it CHAT: Chemical action, Heat, Agitation, and Time. The difference is control. A professional truck-mounted system delivers precise heat, metered chemistry, and mechanical agitation at a scale and consistency that rental equipment cannot match.
| Factor | DIY with rental machine | Professional service |
|---|---|---|
| Heat | Limited; most rentals run cool | High-temperature hot water extraction activates chemistry more effectively |
| Chemical metering | Manual dilution; easy to over- or under-apply | In-line metering controls concentration precisely |
| Agitation tools | Consumer carpet brush or attachment | Rotary machines, professional rakes, and grooming tools |
| Neutralizing rinse | Often skipped or unavailable | Standard step in professional workflow |
| IICRC training | Not applicable | Certified technicians trained to CRI/IICRC standards |
| Dry time | 4 hours typical | Around one hour with truck-mount and airflow management |
Hire a professional when:
- The carpet has oxidized grease or oil that has been set for weeks or months.
- Pet contamination is extensive (multiple rooms or sub-floor saturation).
- The carpet is wool, silk, or another high-value natural fiber.
- The carpet is heavily matted from years of high-traffic use.
- You need a fast dry time and cannot have the room out of service for hours.
- Previous DIY attempts left sticky residue, streaks, or rapid resoiling.
For homeowners in the Northwest Suburbs of Chicago, Carpetandtileplus offers professional vs. DIY comparisons that break down exactly what you gain from a certified technician versus a rental machine. IICRC-certified technicians follow CRI-aligned pre-treatment protocols, use organic product options, and deliver around a one-hour dry time.
Why does carpet look worse after shampooing? Common mistakes and fixes
Rapid resoiling after cleaning is almost always a chemistry or timing problem, not a machine problem.
Common mistakes and what they cause:
- Insufficient vacuuming: Dry soil mixes with the pre-spray and turns to mud. The extractor spreads it rather than removing it. Fix: always vacuum first, slowly, in two directions.
- Wrong pH product: Using a high-alkaline product on wool or a neutral product on heavy grease. Fix: match the product to the fiber and the soil type.
- Letting pre-spray dry before extraction: Creates bonded residue that attracts new dirt immediately. Fix: lightly mist to maintain dampness; never pre-spray more area than you can extract within the dwell window.
- Over-wetting: Saturating the backing causes wicking, where subsurface soils travel up through the fiber as the carpet dries. Understanding how soil wicking works helps you avoid the over-wetting that causes it. Fix: apply pre-spray until fibers are damp, not soaked; use slow extraction passes.
- Skipping the neutralizing rinse: Alkaline residue left in the fiber acts like a soil magnet. Fix: follow alkaline pre-treatment with an acidic rinse solution applied during or after extraction.
- Failing to pre-test: Color change or texture damage discovered after cleaning cannot be reversed. Fix: always test in a hidden area first.
Quick fixes for recoverable problems:
- Sticky feel after drying: re-rinse with a diluted acidic solution (white vinegar and water at roughly 1:4 works as a mild neutralizer for light residue) and extract again.
- Spots reappearing after drying: this is wicking. Re-wet the area lightly, place a clean white towel weighted down over the spot, and allow it to wick upward into the towel rather than back into the pile.
- Streaks or tide marks: apply a small amount of pre-spray to the edge of the mark, agitate gently, and re-extract.
When a problem does not resolve after one corrective pass, stop and call a professional. Aggressive follow-up treatments on already-stressed fibers can cause permanent damage.
Key Takeaways
Carpet pre-treatment works because it uses chemistry, agitation, and dwell time to suspend soil before extraction, and skipping any one of those steps is the primary cause of poor results and rapid resoiling.
| Point | Details |
|---|---|
| Vacuum before any liquid | Dry soil makes up approximately 79% of carpet soil load; wetting it first turns it to mud. |
| Match chemistry to fiber and stain | Alkaline pre-sprays for general soil; enzymatic for organic stains; solvent for grease; wool needs near-neutral pH. |
| Respect dwell time | Most professional-grade pre-sprays need 10–15 minutes; never let the solution dry before extraction. |
| Always neutralize after alkaline pre-spray | An acidic rinse after extraction prevents sticky residue and rapid resoiling. |
| Carpetandtileplus for professional results | IICRC-certified technicians in the Northwest Suburbs of Chicago apply CRI-aligned pre-treatment with organic product options and around a one-hour dry time. |
The step most homeowners rush past
Most articles on carpet pre-treatment spend their time on chemistry and products. The step that actually makes the biggest difference in real-world results is the one that comes before any bottle is opened: vacuuming.
Not a quick pass. A slow, methodical, overlapping vacuum in two directions, with a crevice tool along every baseboard. When you rush this step, you are essentially mixing dry soil into your pre-spray and asking the extractor to remove mud instead of suspended particles. The chemistry cannot do its job when it is fighting a dry soil load that should have been removed mechanically first.
The other habit worth building: pre-test every time, not just with new products. Carpet dyes and fiber conditions change over time. A product that worked fine on your carpet eighteen months ago may react differently today, especially if previous cleanings left residue that altered the fiber’s surface chemistry. Thirty seconds on a hidden corner is cheap insurance against a permanent color change in the middle of your living room.
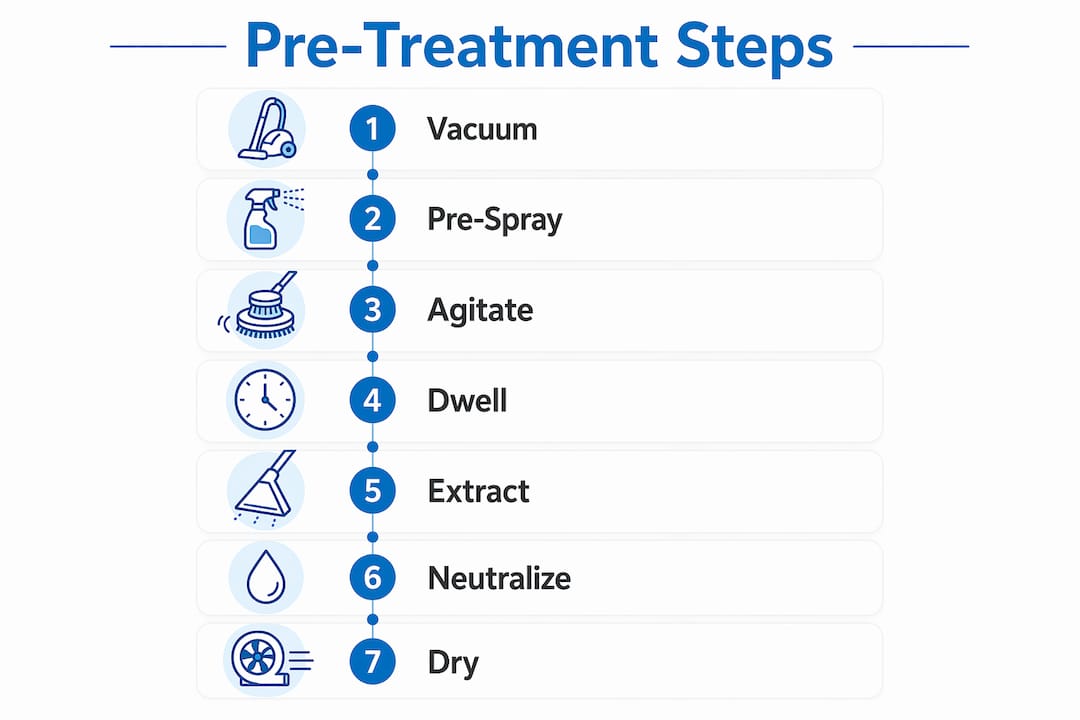
Pre-treatment is not complicated. It is a sequence: vacuum, pre-spray, agitate, dwell, extract, neutralize, dry. The homeowners who get consistently good results are the ones who follow that sequence without skipping steps, not the ones with the most expensive machine.
Carpetandtileplus handles the hard part for Northwest Suburbs homeowners
Pre-treating carpet correctly takes the right chemistry, the right timing, and the right equipment. Carpetandtileplus brings all three to homes across Elgin, Bartlett, Streamwood, Arlington Heights, Palatine, Barrington, and Hanover Park.

Every job uses IICRC-certified technicians who follow CRI-aligned pre-treatment protocols, including a neutralizing rinse that most rental-machine jobs skip entirely. Organic product options are available for households with kids, pets, or chemical sensitivities. Truck-mounted extraction delivers around a one-hour dry time, so your rooms are back in use the same day. For heavy pet contamination, the carpet odor removal service targets the sub-fiber contamination that general pre-treatment alone cannot reach.
Ready to skip the guesswork and get a genuinely clean carpet? Book a residential cleaning with Carpetandtileplus and see what IICRC-certified pre-treatment actually looks like.